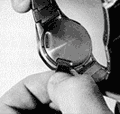
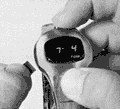
|
Magnet setting instructions
1. Resetting hours
2. Resetting minutes and seconds
3. To set date and am/pm indicators
4. To reset month
Pulsar has a setting feature which permits hours and minutes to be set independently. This allows you to reset hours to different time zones, or shifts from standard to daylight saving time, without disrupting the accuracy of minute and seconds calculations.
 1. Resetting hours only: 1. Resetting hours only:
Take the
timeset bar from the bracelet clasp and insert it into the recess on the case back marked "HR". This causes the displays to light up and the hours to advance. Remove the timeset bar when the proper hour has bee reached.
Note:
The am/pm dot (if available) will alternate if the hours display passes through 12 during hours setting. If the wrong am/pm dot position occurs, merely advance the hours through 12 to the correct hour indication. This will simultaneously reverse the am/pm indication.
Resetting
Time, Month and Date
Hour/minute/second reset and month/date reset functions operate independently of one another. However, when it becomes necessary to completely reset your Pulsar, do so in the following sequence to minimize setting confusion: minutes, hours, am/pm, date, then month.
 2. Resetting minutes and seconds 2. Resetting minutes and seconds
Insert the timeset bar
in the recess on the case back marked "MIN". This causes the displays to light up and the minute digits to advance. It also automatically resets seconds to 00. Set the time to the upcoming minute and quickly remove the
timeset bar. Do not press the command button at this time. (Pulsar will not begin time calculations until the command button is touched).
To synchronize your Pulsar, use an accurate
time source such as a clock of known accuracy, a TV or a radio transmission. When your time source and the time you have set coincide, press the
command-button. This starts the Computer. Note that to properly synchronize the seconds, you must always start your Pulsar on the exact minute (such as 12:08:00).
 3. To set date and am/pm indicators 3. To set date and am/pm indicators
Simultaneously press both command buttons, then place timeset bar in the "HR" recess in the case back. This will cause the displays to light up and advance the date. At the same time, as each date number changes, am and pm indicators (upper and lower dots between month and date numbers) will alternately light up. Remove the timeset bar when the proper date appears and when the am or pm indicators is correct. (Upper dot indicates am, lower dot for pm.)
4. To reset month
Press Date/Command button only (top or left button), then insert timeset bar in the "HR" recess in the case back. Again, the displays will light up and the month will advance. Remove the timeset bar when the correct month appears. |